Hello, today I will try to teach how to configure a DNS (Domain Name Server or System). “Putting a DNS server on a network allows for the replacement of IP addresses of individual machines by a name. As a result, it’s
DNS
even possible to associate multiple names to the same machine to update the different available services. For example, www.example.com and pop.example.com, could both point to the primary server where the mail server and the business intranet reside, and the domain could be example.com. It’s easy to remember that these two services are running on the same machine whose IP address is 192.168.0.1.
Note: This post is part of a bigger Debian GNU-Linux material that you can access here.
Now imagine that our network administrator decides for some reason or another to move the mail server to the machine 192.168.0.11. The only thing that has to be changed is the DNS server configuration file. You could always go and modify the host configuration for all the users, but that would be time consuming and inconvenient.”
Taken from: https://wiki.debian.org/Bind9 on 2014-03-19
To work with Symfony, many people recommend to install every thing as a separate entity; PHP, Apache and MySQL. But sometimes the reality is different and you just need to use what you need to use. That was my case. I had WAMP Server 2.4 working for WordPress and I neded to install a Symfony 2.4 project, no option. So I decided to just meet the Symfony dependencies and install it. Then I created a cert of manual or how to? to help to guide others that might have the same problem. Also you might want to do it because of some other reason, but that was my reason. I was requested to do it like that and only like that. And in my country we have a saying that teaches something like this. If someone wants something even if it is a bad thing; don’t give him other thing. Of course I do not mean that WAMP or Symfony together are a bad thing. This is what I have done: Software to install:
WAMP Server 2.4.
Symfony Requirements
Symfony 2.4
Note: this post is about installing Symfony in windows with wamp if you work with Linux you can use this material. and if what you want is to move an app from development to a production environment, you need to do this.
WAMP Server 2.4
1- Install WAMP server 32 bits.
Get wamp from here. Because of some incompatibilities with some versions of cache accelerators for php 5.4 64 bits it’s preferable to install the WAMP server 32 bits version. I have had problems to make the 64 bits work, but I can not 100% confirm it was because of incompatibility. I have installed wamp 32 bits latest version in: D:\Web\wamp. You can install it where ever you want, even the default path is a nice place for most people.
Before installing wamp you need to make sure you have installed Microsoft Visual C++ 2010 Redistributable, if you do not have it you can get the the version for 32 bits Windows from here, and for 64 bits from here.
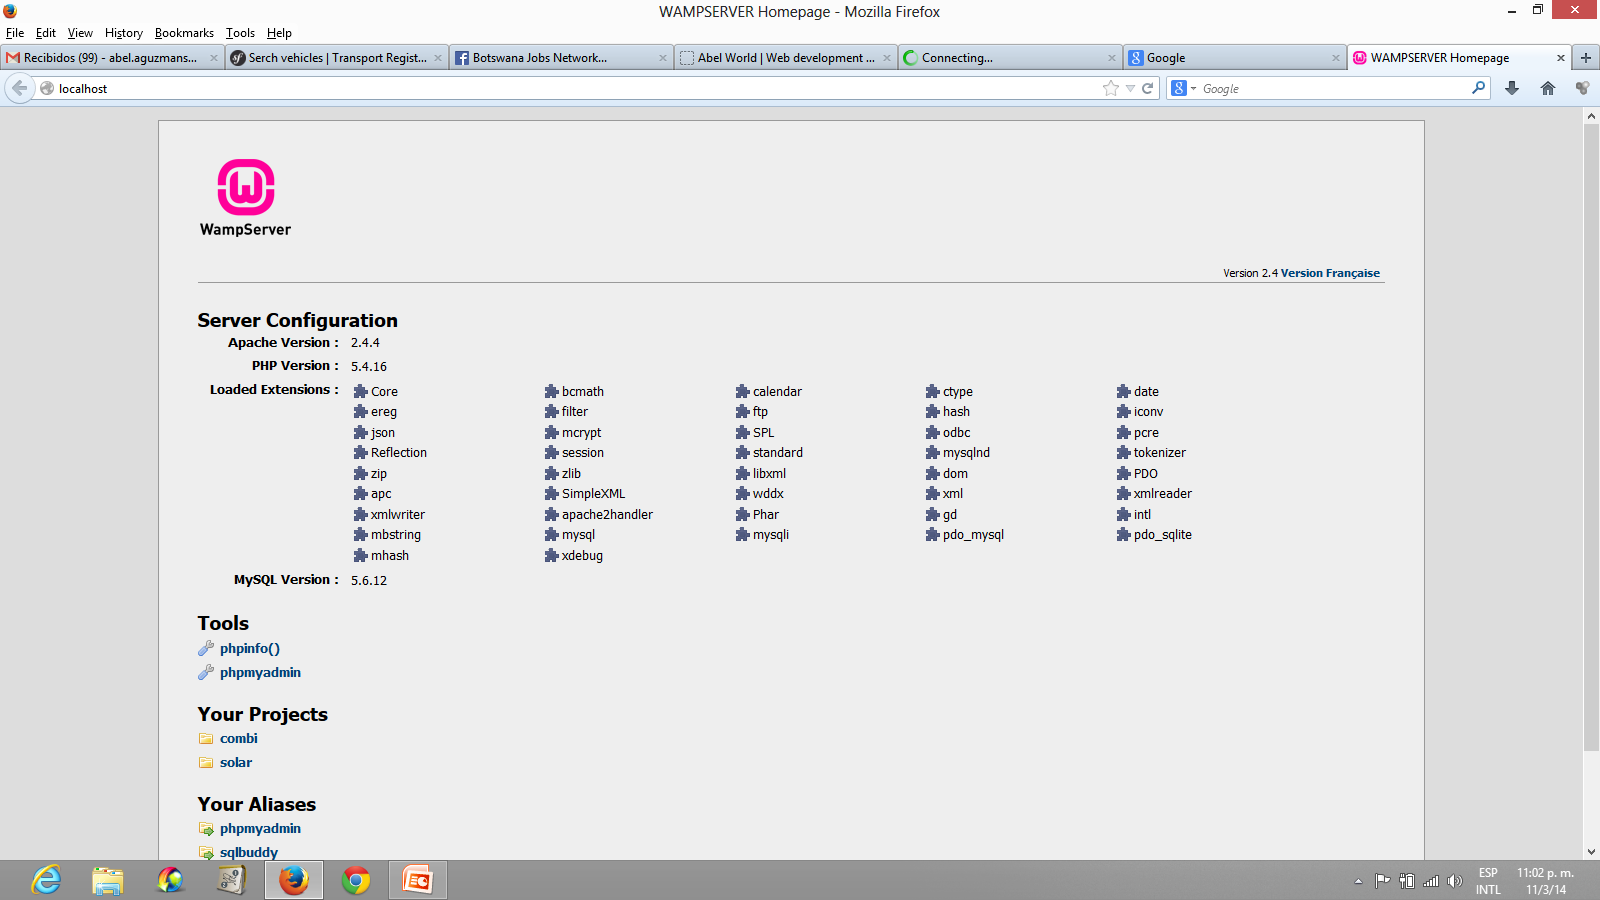
The installation process goes straight forward normally is a next-next matter. Once you are done you can start the service straight away and test it by writing in your browser address bar:
http://localhost
Check out the picture.
2- PHP ssl module working
we need to install Composer the tool recommended and that we will use to download Symfony from the prompt. Composer recommends to have the php ssl module working. To do that we need to edit the php.ini for cli as when you enter commands in the prompt the system does not run the commands through Apache, so is the cli php.ini the one we need to edit. So edit the php.ini in Your\installation\path\php\php5.4.12\php.ini (the php version might change depending on the version of WAMP). On the file go to the extensions section and remove the ; from the extension for ssl.
extension=php_openssl.dll
This let’s composer run secure PHP connections from the prompt.
Activate environment variable for PHP, MySQL and Composer once you install it. add to the environment variable called PATH the path to your PHP, MySQL and Composer.
Environment variables for Symfony
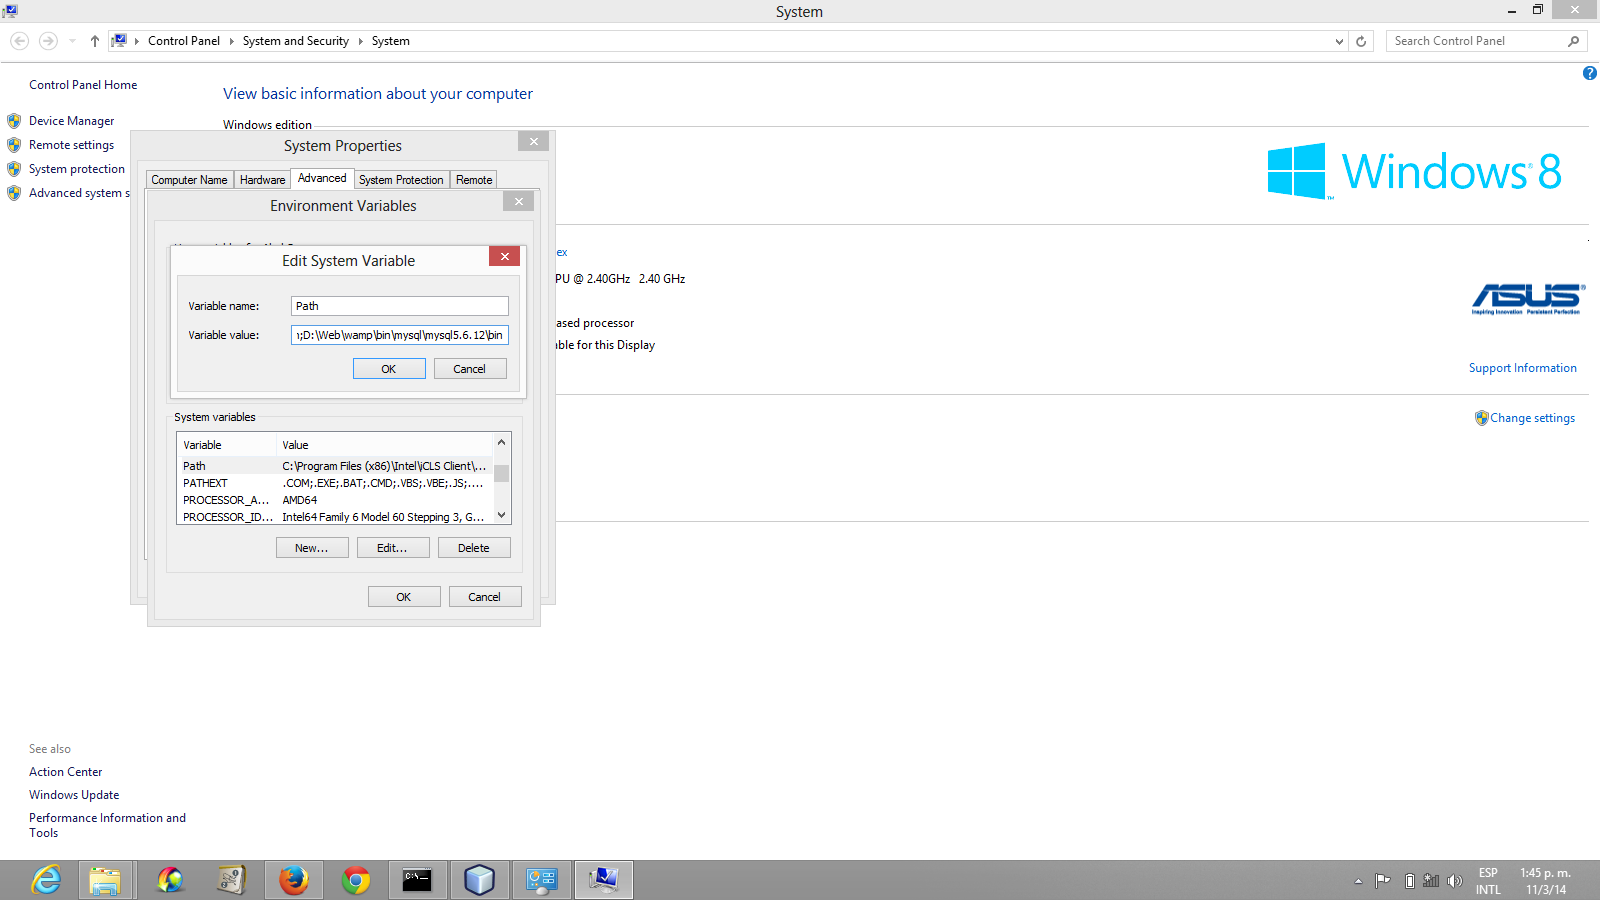
To edit the system PATH environment variable:
Right-click on My Computer/Computer and select Properties
Select the Advanced system settings tab in the advanced dialog that appears
Click on the Environment Variables button
Locate PATH in the System variables list
Click Edit and add your directories containing the binaries separated by ; mine looks like this:
If you look closer there is a ; between every path that I specify. And the path is just the route to the executable files of the software that you want to be declared in your environment.
Note: Wamp’s php comes with a xdebugger version (a symfony requirement) so it does not need to be installed.just edit the nesting level. to do that update Apache’s php.ini and set the xdebug.max_nesting_level to 250:
[xdebug]
 xdebug.remote_enable = off
 xdebug.profiler_enable = off
 xdebug.profiler_enable_trigger = off
 xdebug.profiler_output_name = cachegrind.out.%t.%p
 xdebug.profiler_output_dir = "D:/Web/wamp/tmp"
 xdebug.max_nesting_level = 250
In normal conditions you will only have to add the last line.
5- Install a cache manager extension.
Normally you can install APC (http://dev.freshsite.pl/php-accelerators/apc/file/details/apc-3114-beta-for-php-54-win72008.html) or Opcache (http://dev.freshsite.pl/nc/php-accelerators/zend-opcache). I have decided to install APC if you have any newer PHP version 5 or newer Opcache is recommended as the default PHP acelerator even incorporated in the default installation.
To install APC, first copy the file to the extension_dir (you can find it in your php.ini).
Then add the following to the php.ini file.
extension=php_apc_3114_beta_php54_win7-2008.dll
where php_apc_3114_beta_php54_win7-2008.dll is the name of the apc dll downloaded from the URL, and it´s copied in the folder php/ext as I mentioned before.
If you want Symfony to use Opcache for this version of PHP, it should be something like this in you php.ini file.
As we also have Xdebugger by default in WAMP we need to put the configuration before the xdebugger configuration in order for it to work otherwise it will not load.
Taken from: http://www.php.net/manual/en/opcache.installation.php
6- Activate other PHP modules
I recommend these if they are not already active to be active in yout php.ini:
-Open a command prompt and load the path to the install files, normally something like c:/wamp/www/project or in my case D:\Web\wamp\www\combi.
-Open your command prompt (CMDor any other you prefer) and load the folder where you have installed. Have the forder for your project to do that you can use the commands cd, mkdir, etc.
Note: If you are behind a proxy server you have to set and environment variable to say who is the proxy and how to authenticate. open a terminal and write something like this:
SET HTTP_PROXY=http://username:password@proxy.yourdomain.com:8080
SET HTTPS_PROXY=http://username:password@proxy.yourdomain.com:8080
Remember to change the parameter to fit in your network. username, password,proxy server name and domain or IP and the proxy port.
Symfony config check
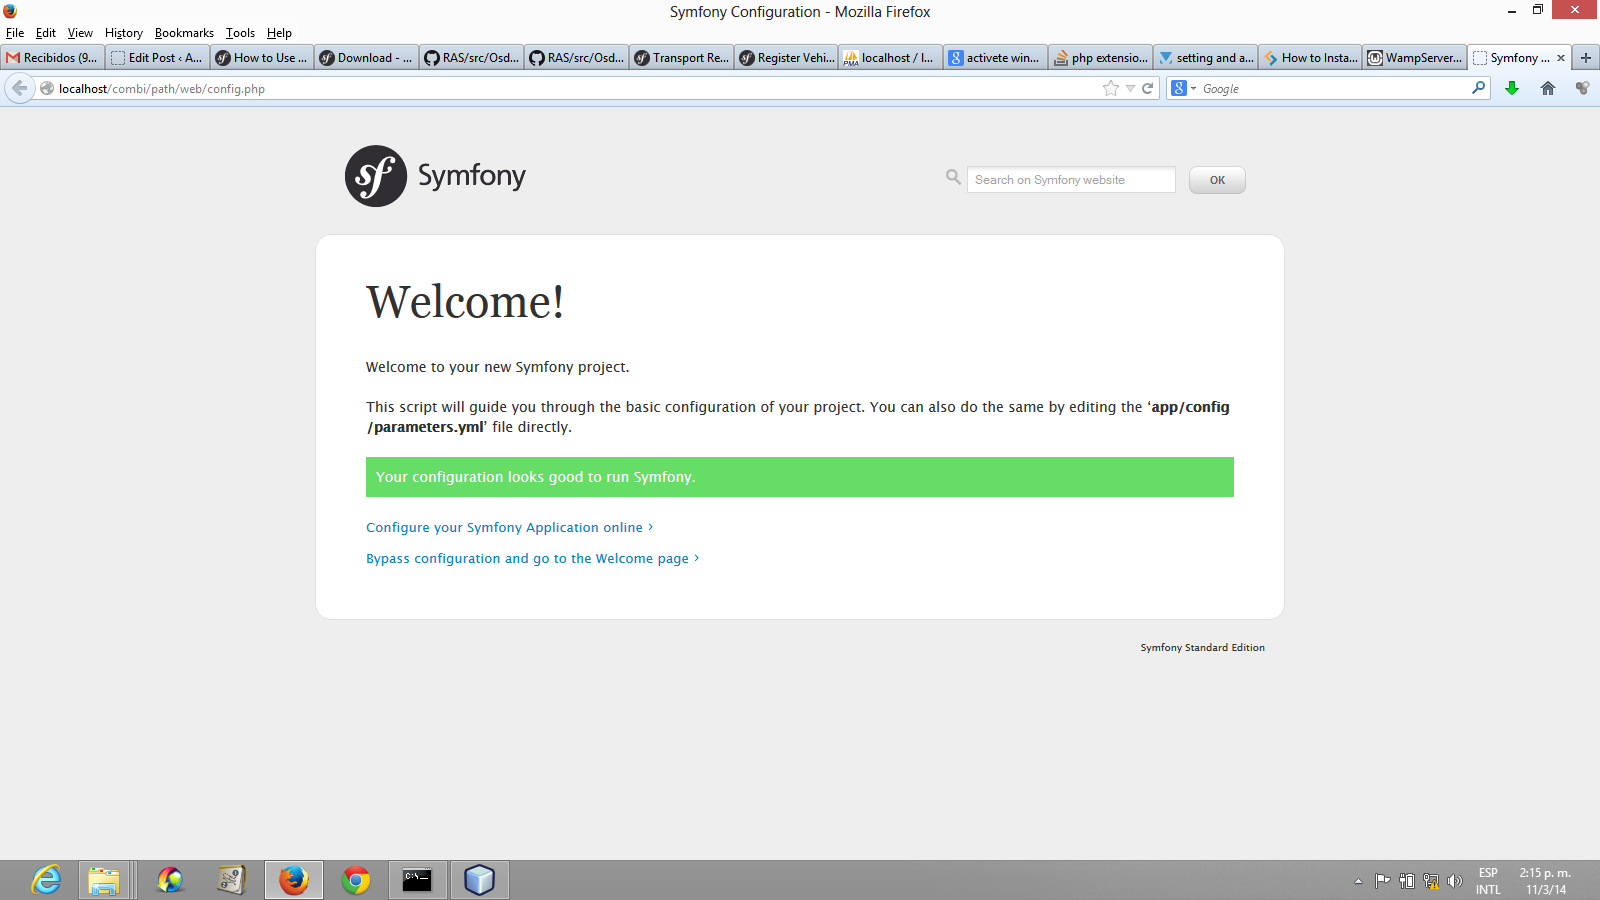
And that is it. We are done after the download is finished you can check that every thing is working. To do that put the following in the browser or at least something similar:
http://localhost/combi/path/web/config.php
Under normal circumstances if everything went well you should get something like the picture, otherwise, review the step corresponding to the problem.
The DHCP protocol was created to configure computers automatically just by connecting them to the network. That means that thanks to this protocol you dont need to do any thing to be able to connect to certain networks. you connect a new computer and the computer it self is able to talk to a server and get what it need to be able to connect and use the network resources that are available. but tel’s leave the smart guys to define what is the protocol.
“DHCP (Dynamic Host Configuration Protocol) is a communications protocol that lets network administrators centrally manage and automate the assignment of Internet Protocol (IP) addresses in an organization’s network. Using the Internet Protocol, each machine that can connect to the Internet needs a unique IP address, which is assigned when an Internet connection is created for a specific computer. Without DHCP, the IP address must be entered manually at each computer in an organization and a new IP address must be entered each time a computer moves to a new location on the network. [The protocol] lets a network administrator supervise and distribute IP addresses from a central point and automatically sends a new IP address when a computer is plugged into a different place in the network.”
Taken from: http://searchunifiedcommunications.techtarget.com/definition/DHCP on 2014-03-04.
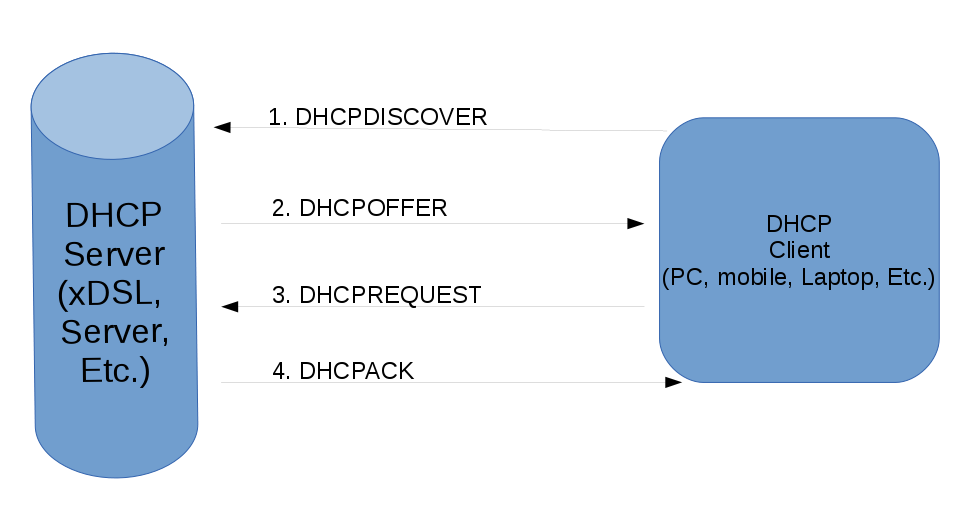
As a mater of fact what happens between the Client PC that wants to connect to the network and the server is a cert of conversation of messages until the client gets and IP addess. That is valid for a certain period of time defined by the server; check out the first picture. The messages include but not only the following.
DHCPDISCOVER (taken from wikipedia) It is a message that marks the beginning of an interaction between client and server. This message is sent by a client (host or device connected to a network) that is connected to a local subnet. It’s a broadcast message that uses 255.255.255.255 as destination IP address while the source IP address is 0.0.0.0
DHCPOFFER It is message that is sent in response to DHCPDISCOVER by a server to the client. This message contains the network configuration settings for the client that sent the DHCPDISCOVER message.
DHCPREQUEST This message is sent in response to DHCPOFFER indicating that the client has accepted the network configuration sent in DHCPOFFER message from the server.
DHCPACK This message is sent by the server in response to DHCPREQUEST recieved from the client. This message marks the end of the process that started with DHCPDISCOVER. The DHCPACK message is nothing but an acknowledgement by the DHCP server that authorizes the DHCP client to start using the network configuration it received from the DHCP server earlier.
In the other hand we will use today ISC’s DHCP server. ISC’s DHCP (isc-dhcp-server in Debian) software is the most widely used open source DHCP implementation on the Internet. The same software can be used for LAN too. It is a carrier and enterprise grade solution for any host configuration needs.
But before we start I have to give some advise about precautions that we need to make sure of.
Precautions before start.
After installing the necessary packages isolate the server fragment of network fron the rest of the computers. If you have an error in your configuration you can prevent computers from connecting. After you finish configuring, once you are sure that the configuration is working join the DHCP server to the network and monitor the behavior of the computers.And also make sure that you always backup your initial configuration file.
Installation of ISC DHCP Sever.
As usual, installation is very simple with apt. As root simply run
# aptget install iscdhcpserver
or
# aptitude install iscdhcpserver
Sample output.
Reading package lists... Done
Building dependency tree
Reading state information... Done
Suggested packages:
isc-dhcp-server-ldap
The following NEW packages will be installed:
isc-dhcp-server
0 upgraded, 1 newly installed, 0 to remove and 11 not upgraded.
Need to get 0 B/411 kB of archives.
After this operation, 938 kB of additional disk space will be used.
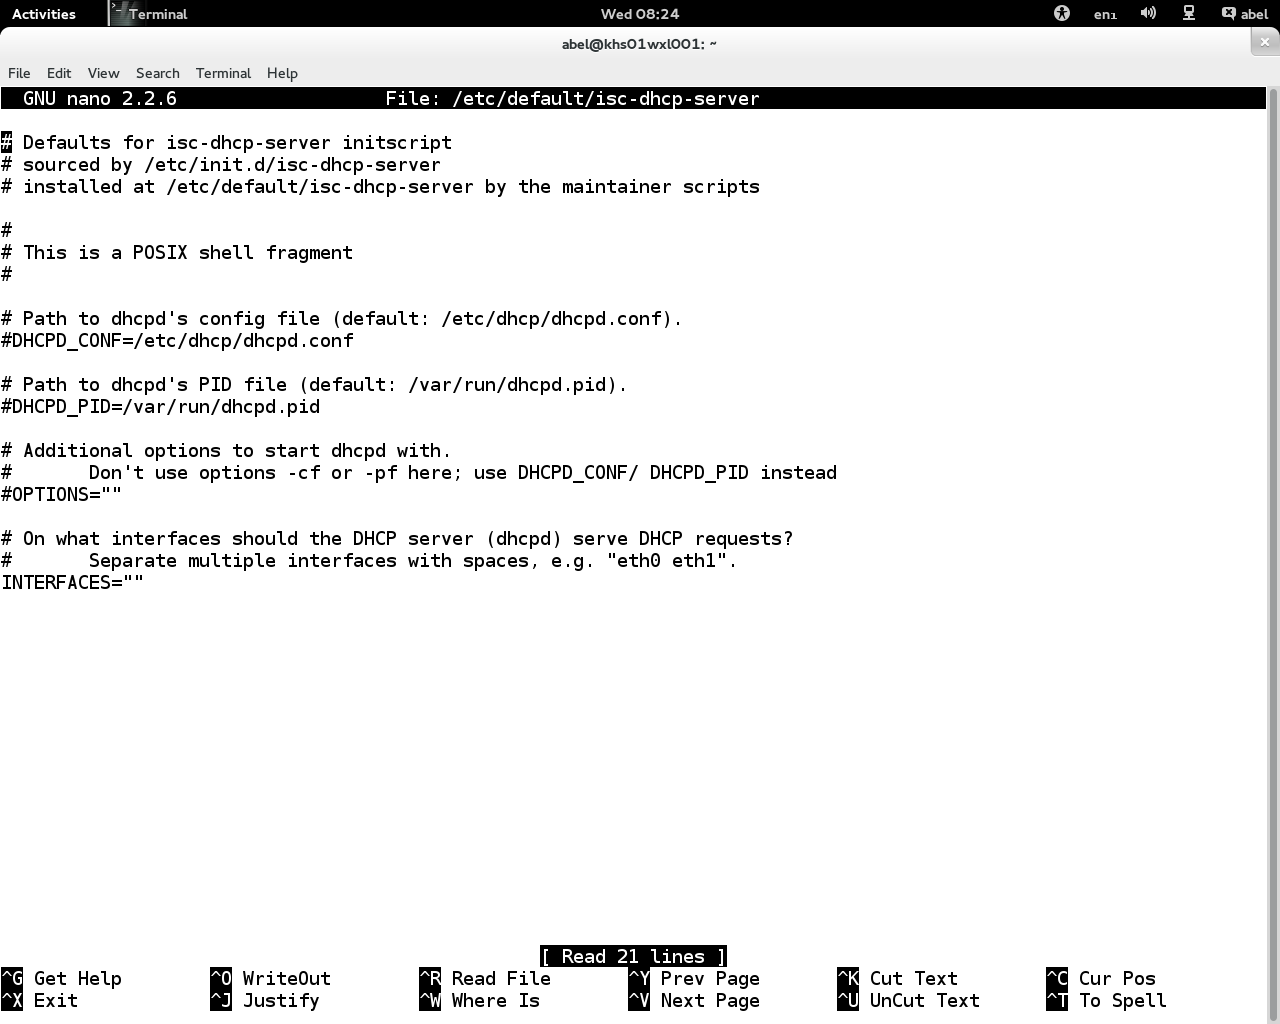
The main configuration files are /etc/default/isc-dhcp-server. That stores the stating conditions and configurations for the software. And /etc/dhcp/dhcpd.conf that stores the actual configuration of the software.
Note: Remember to back up the original files as I advised before doing any work. To do that you can save the file on a different location or you can save it in the same place with a different name.
Edit isc-dhcp server default file
The first thing is to create the condition for the server to start. For that the only real requirement is to say the network interface to listen. Todo that first you should edit or create the file /etc/default/isc-dhcp-server with root permissions, either by running dpkg-reconfigure isc-dhcp-server or enter something like this into the file /etc/default/isc-dhcp-server:
INTERFACES="eth0"
Where Eth0 is the name of the only Ethernet interface that I have. If you have more that one then you need to decide if you are using only one or more than on for this service. In case You can check out the picture for more information.
Homework A: research about the command dkpg.
After this we don’t really need to change any thing else, but for more advanced configurations you might need to modify this file again. Any way for normal organization requirements you do not really need to do it, so for now we leave like that. Now is the moment to create the actual configuration.
Note: As we are supposed to have backed up the original file. Now you can just create a new file from scratch, and I mean delete the original file (the one we have a back up already). And create a new file with the same name.
For a basic configuration on any real organization, you have to add/edit/create the following lines in /etc/dhcp/dhcpd.conf.
option domainname "spices.org";
To specify the domain to use by the server and the clients. Also you should add this this line to the file:
This entry provides the IP addresses of two domain name servers (DNS), but one would be enough. You have to list here the DNS that work for your network, the addresses given here will most likely not work for you. So you should modify them to have your real DNS servers.
Now we are only missing with defining the network that we will use and the IP addresses that the server can use to give to the “customers”. Check it out:
subnet 192.168.1.0 netmask 255.255.255.0 {
range 192.168.1.1 192.168.1.10;
option routers pepper.spices.org;
}
This entry defines the LAN in the first line 192.168.1.0/255.255.255.0 is a /24 network. The IP addresses 192.168.1.1 to 192.168.1.255 are typical for an Intranets in many places. The second line defines the range of IP addresses to give to the clients 192.168.1.1 to 192.168.1.10. And lastly the gateway is defined in option routers, this name pepper.spices.org can be changed by any other name or IP address. And it will be the default gateway for the clients. Otherwise we are done with the configuration. Just to say that the ; is very important in the single lines and the {} defines a block of configuration parameters.
Now we just have to start the service and check that the service is working properly. To do that you just need to run the following command.
service isc-dhcp-server start
Or also you can use the old fashion method:
/etc/init.d/isc-dhcp-server start
Checking the results
Now, if it does not give an error we are likely to have finished configuring the server. But we need to double check that the configuration is working properly. For that I am going to introduce a few commands and concepts. Debian GNu Linux like a lot of Unix like systems has a lot of logs that record the things that happen on the system. But there is a really important file that stores the system logs. You can understand Kernel and other very important software’s logs. In Debian and many other Linux distributions you can find this info in the file /var/log/syslog. To check if the dhcp is working we should go to this file.
But if we open it with for instance with nano. We might be lost given the fact that this file records a lot of lines every hour and it might be hundreds of pages. Also nano and similar software show only the records (understand lines) that are in the file when you open it. So it does not update it self’s content dynamically. Then if the server is writing all the time and doing new jobs we will not be able to see it with nano unless we load again the page again and look for the new content. Which is fine for a small fine but not for hundreds of pages. So we need a new command that can show only the las part of the file and dynamically show it’s content as it is being created. Fortunately there is a really simple and nice command.the command is “tail”. and we can use if in this case in the following ways:
tail -f /var/log/syslog
and if we want to see the end of the file only statically we can use it this way:
tail -n100 /var/log/syslog
Where -n100 means the last 100 lines, so you can change this number to what ever you want.
Also we can use the “cat” command. What is does is that it shows the whole content of a file:
cat /var/log/syslog
Let me just show a sample of “tail -f” for a DHCP server that is working:
root@khs01sw10:~# tail -f /var/log/syslog
Mar  5 09:31:05 khs01sw10 dhcpd: DHCPREQUEST for 10.175.1.164 from 00:0f:fe:c6:1f:76 (medimizer3) via eth0
Mar  5 09:31:05 khs01sw10 dhcpd: DHCPACK on 10.175.1.164 to 00:0f:fe:c6:1f:76 (medimizer3) via eth0
Mar  5 09:31:06 khs01sw10 dhcpd: DHCPREQUEST for 10.175.1.198 from 00:30:05:c0:99:22 (khs01wx0010) via eth0
Mar  5 09:31:06 khs01sw10 dhcpd: DHCPACK on 10.175.1.198 to 00:30:05:c0:99:22 (khs01wx0010) via eth0
Mar  5 09:31:07 khs01sw10 dhcpd: DHCPINFORM from 10.175.1.89 via eth0
Mar  5 09:31:07 khs01sw10 dhcpd: DHCPACK to 10.175.1.89 (d4:3d:7e:d3:ed:ba) via eth0
Mar  5 09:31:07 khs01sw10 dhcpd: DHCPINFORM from 10.175.1.97 via eth0
Mar  5 09:31:07 khs01sw10 dhcpd: DHCPACK to 10.175.1.97 (d4:3d:7e:d3:ee:8d) via eth0
Mar  5 09:31:08 khs01sw10 dhcpd: DHCPREQUEST for 10.175.1.96 from 00:02:e3:32:c4:4b (khs01wx0188) via eth0
Mar  5 09:31:08 khs01sw10 dhcpd: DHCPACK on 10.175.1.96 to 00:02:e3:32:c4:4b (khs01wx0188) via eth0
Mar  5 09:31:08 khs01sw10 dhcpd: DHCPREQUEST for 10.175.1.184 from f0:27:65:35:45:73 (android-7f4c9b6f9482a823) via eth0
Mar  5 09:31:08 khs01sw10 dhcpd: DHCPACK on 10.175.1.184 to f0:27:65:35:45:73 (android-7f4c9b6f9482a823) via eth0
Mar  5 09:31:08 khs01sw10 dhcpd: DHCPINFORM from 10.175.1.221 via eth0
Mar  5 09:31:08 khs01sw10 dhcpd: DHCPACK to 10.175.1.221 (74:de:2b:ce:25:f4) via eth0
Mar  5 09:31:08 khs01sw10 dhcpd: DHCPREQUEST for 10.175.0.167 from 00:1e:79:28:5f:40 (Switch) via eth0
Mar  5 09:31:08 khs01sw10 dhcpd: DHCPACK on 10.175.0.167 to 00:1e:79:28:5f:40 (Switch) via eth0
^C
root@khs01sw10:~#
Homework B: How does the following command Works: dhclient
In class we have seen a really simple configuration, but isc-dhcp-server is able to handle much more complex ones for different user requirements. Please bring different examples of configurations to the next class and try to explain a possible use case for that configuration.
Along this Debian class we will deal with the following. Debian file system, superuser, editing text files, executing commands in the shell, configuring, installing and uninstalling packages.
This post is part of a bigger Debian material that you can access here.
Debian File system, users and superusers; Introduction.
Debian GNU Linux uses the superuser paradigm. In computing, “the superuser is a special user account used for system administration. Depending on the operating system, the actual name of this account might be: root, administrator, admin or supervisor. In some cases the actual name is not significant, rather an authorization flag in the user’s profile determines if administrative functions can be performed. In operating systems which have the concept of a superuser, it is generally recommended that most application work be done using an ordinary account which does not have the ability to make system-wide changes.”
Taken from: http://en.wikipedia.org/wiki/Superuser on 2014-02-16
Debian Linux is of course a system with the superuser paradigm, by default the superuser name is root. But root might refer also to other parts of the system. Root is where every thing starts in Linux systems is like the alpha of the system. Is the “father
directory” (root directory represented by / ) in the file system. And root is also the “superuser”. to see the root directory you can execute the ls command from the fist class.
ls /
or
ls -la /
and to know if your current user is root you can use the whoami command also from the first class.
whoami
The root user is the privileged user of the system and is a lot more powerful than the Windows administrator; this user can even destroy the systems and it will not be even waned about it. The concept behind it is that this user should only be used when is strictly required. As you might already figure out you need to be extremely careful when working with this user. A lot of power comes with a lot of respectability. To continue with the root user now we will learn a command that helps to change your session to other users. ler say you are rafael and you want to change to miguel or to root. Well “su” is the command that you can use for that un debian and in most Linux systems. You can execute this command by it self:
su
Now it will prompt you for the root password and after you introduce it correctly it will change to the root user. Or if you want to change to a specific user you can use su, followed by the user name.
su class
To know the user you are in you can use the who am I command again.
whoami
As some of you might have noticed there is a small difference in the prompt between the root user and the non-privileged user. the non-privileged user appears in the shell with a $ and the root user with a # symbol. Check out this example:
abel@khs01wxl001:~$ whoami
abel
abel@khs01wxl001:~$ su
Password:
root@khs01wxl001:/home/abel# whoami
root
root@khs01wxl001:/home/abel# su abel
abel@khs01wxl001:~$ whoami
abel
abel@khs01wxl001:~$
The linux systems and Debian as one of them works like a cage for users. If you are abel and you execute su, then you login to root. But the session for abel does not end. After you execute su and change to root you can go back to your old session. To do that you just have to execute the command “exit” and it will take you back to the old user.
Before we continue with other content related to the file system and the super user. Let me introduce a few other commands and concepts.
System restart and shutdown; init run levels-command
init 0 – Shootsdown the computer. DEPRECATED in favour of “shutdown -h”
init 6 – Reboots the system.DEPRECATED in favour of shutdown e.g.: “shutdown -r +1”
Homework A:
What are the init run levels?
There are other init run levels from 1 to 5. What do they do?
Command to view current the network configuration; ifconfig.
“The ifconfig is used to configure the kernel-resident network interfaces. It is used at boot time to set up interfaces as necessary. After that, it is usually only needed when debugging or when system tuning is needed.
If no arguments are given, ifconfig displays the status of the currently active interfaces. If a single interface argument is given, it displays the status of the given interface only; if a single -a argument is given, it displays the status of all interfaces, even those that are down. Otherwise, it configures an interface.”
Taken from ifconfig Debian official manual (man ifconfig)
Tor now we will use it just to view the network interface to view the interfaces configuration you just have to insert the command as root.
Feel free to research about this very useful command.
Remote connections using ssh protocol.
“OpenSSH is a FREE version of the SSH connectivity tools that technical users of the Internet rely on. Users of telnet, rlogin, and ftp may not realize that their password is transmitted across the Internet unencrypted, but it is. OpenSSH encrypts all traffic (including passwords) to effectively eliminate eavesdropping, connection hijacking, and other attacks. Additionally, OpenSSH provides secure tunneling capabilities and several authentication methods, and supports all SSH protocol versions”
Taken from: http://www.openssh.com/ on 2014-02-16.
In the other hand, the Debian Official CD version comes with the ssh client installed by default. (that means you can use it to connect to ssh servers). And the ssh server can also be installed from repository. here is as example of how to connect through ssh.
root@khs01wxl001:~# ssh root@10.175.0.1
root@10.175.0.1's password:
Linux khs01sw10 2.6.325amd64 #1 SMP Mon Sep 23
22:14:43 UTC 2013 x86_64
(...)
Debian GNU/Linux comes with ABSOLUTELY NO WARRANTY, to
the extent
permitted by applicable law.
Last login: Mon Feb 17 15:50:11 2014 from 10.175.0.167
root@khs01sw10:~#
Here in the first line you basically say that you are going to use ssh to connect with root at the host 10.175.0.1 (ssh root@10.175.0.1). If your connection is fine, the remote host has a ssh server running and you are allowed to connect from your IP address then you will be prompted for the password. Then insert the password and press enter and thats is it. You should login be logged in to the remote system. Only then you can execute any command on the remote system, like for instance init 6 to restart the remote system or also you can perform any other task there.
Mount command
As an additional homework lets call it B -I leave you the mount mount command
# mount
Research about how can we use the mount command?
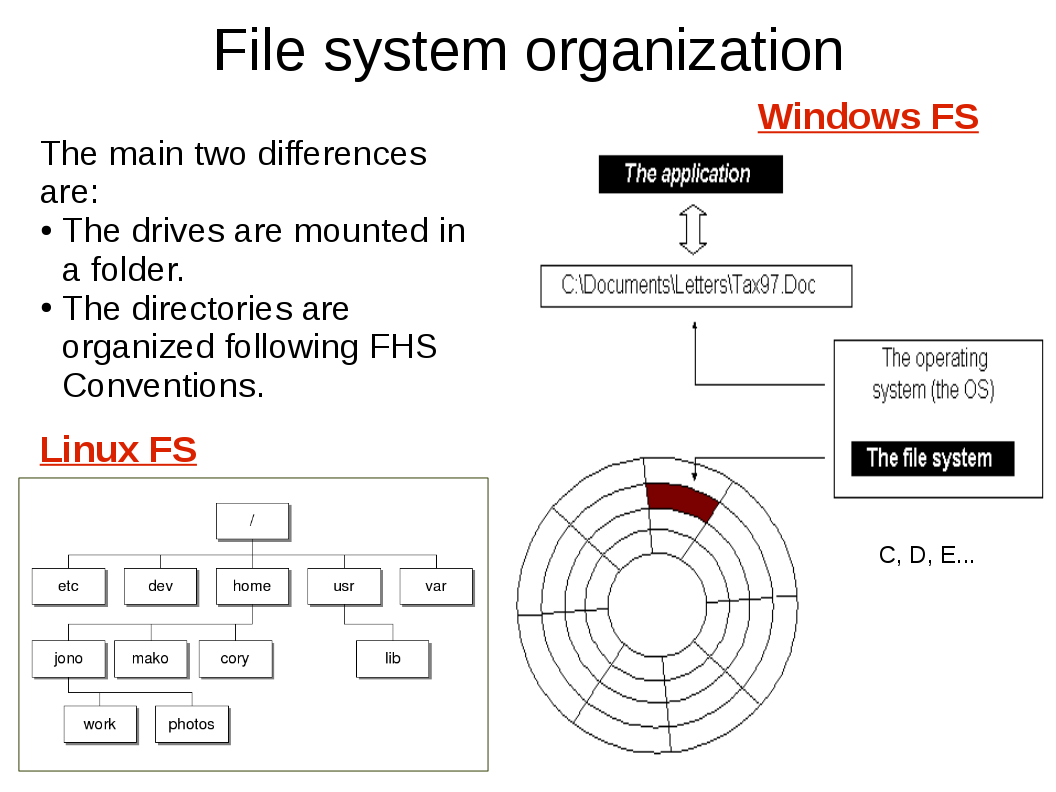
File system Linux vs Windows
Organization of the root directory and HDDs in Linux.
To organize the file system most modern Linux distribution like Debian use the File system Hierarchy Standard. That is an agreement between some authorities of the Free software, some companies and individuals to improve the systems efficiency and interoperability. As per Wikipedia:
The Filesystem Hierarchy Standard (FHS) defines the directory structure and directory contents in Unix and Unix-like operating systems, maintained by the Linux Foundation. The current version is 2.3, announced on 29 January 2004.[1]
Taken from: http://en.wikipedia.org/wiki/Filesystem_Hierarchy_Standard
on 2014-02-16.
You can find more information about it here and here. but for now to continue let me just mention the main directories that we will use along
FHS
This classes. Please feel free to user the ls command and also the CD command from class 1 to understand this structure.
/etc – Configuration files for most of the
softwares eg: ssh, network, dhcp, etc.
/home – users folder exept for the root user
eg: class, abel, pedro, miguel, etc.
/var -variable data eg: databases, caches,
logs.
And secondly we will also work with:
/media- Is the mounting point for removable media.
/mnt- mounting point for temporary mounted file systems.
/boot- boot loader static files.
/bin – essential user command binaries
Also we will work with the root user’s folder. So I will leave a homework, for you to research about it.
Homework C:
Where is the root user folder?
Now to continue with the class lets first learn hot to edit with nano.
Editing files with nano.
“nano is a text editor for Unix-like computing systems or operating environments using a command line interface. It emulates the Pico text editor, part of the Pine email client, and also provides additional functionality. In contrast to Pico, nano is licensed under the GNU General Public License.”
Taken from: http://en.wikipedia.org/wiki/Nano_%28text_editor%29 on 2014-03-04
There are some other text editors like vi or vim both also for the shell and gedit or leafpad for the graphic interface. You can use the one you want or can. But in this classes I will assume you are using nano. Basics with nano:
To edit a file: $ nano /path/to/file.\
Nano internal commands:
CTRL + x: closes the file.
CTRL + o: saves.
CTRL + c: cursor position.
CTRL + k: cuts from nano.
CTRL + y: paste to nano from nano
CTRL + C cancels the current action if it’s not finished or says information about the cursor’s position.
Exersice 1: Create a text file called class1 in /home/class. Write some content and practice the commands from last slide.
The repository
“Commmonly refers to a storage location, often for safety or preservation. Many software publishers and other organizations
maintain servers on the Internet for this purpose, either free of charge or for a subscription fee. Repositories may be solely for particular programs, such as CPAN for the Perl programming language, or for an entire operating system. Operators of such repositories typically provide a package management system, tools intended to search for, install and otherwise manipulate software packages from the repositories. For example, many Linux distributions use Advanced Packaging Tool (APT), commonly found in Debian based distributions, or yum found in Red Hat based distributions. There are also multiple independent package management systems, such as pacman, used in Arch Linux and equo, found in Sabayon Linux.”
Taken from: http://en.wikipedia.org/wiki/Repository on 2014-02-16.
Now as the repository is formed by packages we have to define. What is a package?
“A package format is a type of archive containing files and additional metadata found on packages.While the archive file format itself is unchanged, package formats additionally specify the contents, such as requiring a manifest file or certain directory layout. The term is particularly used on Unix systems, and there are several formats available, both for Linux distributions and BSD systems, though the concept also includes pkg files on Mac OS X, MSI files on Windows, JAR files for Java, among others.”
Taken from: http://en.wikipedia.org/wiki/Linux_packages on 2014-03-04.
An other valid definition for package could be this one:
“In Linux distributions, a “package” refers to a compressed file archive containing all of the files that come with a particular application. The files are usually stored in the package according to their relative installation paths on your system. Most packages also contain installation instructions for the OS, as well as a list of any other packages that are dependencies (prerequisites required for installation.”
Taken from: http://www.internetblog.org.uk/post/1520/what-is-a-linux-package/ 2014-03-04.
Debian Package Management
apt-get – package manager
aptitude – higher level package manager.
aptitude install ssh
aptitude install mc
Homework C –
What us the diference between:
aptitude update
aptitude install
aptitude upgrade
How do you remove a packege?
How can you search for a package?
And that is it for today. On the next class we will discus about the package manager and we will install a DHCP server. be ready for it.
Network and DNS client configuration; introduction
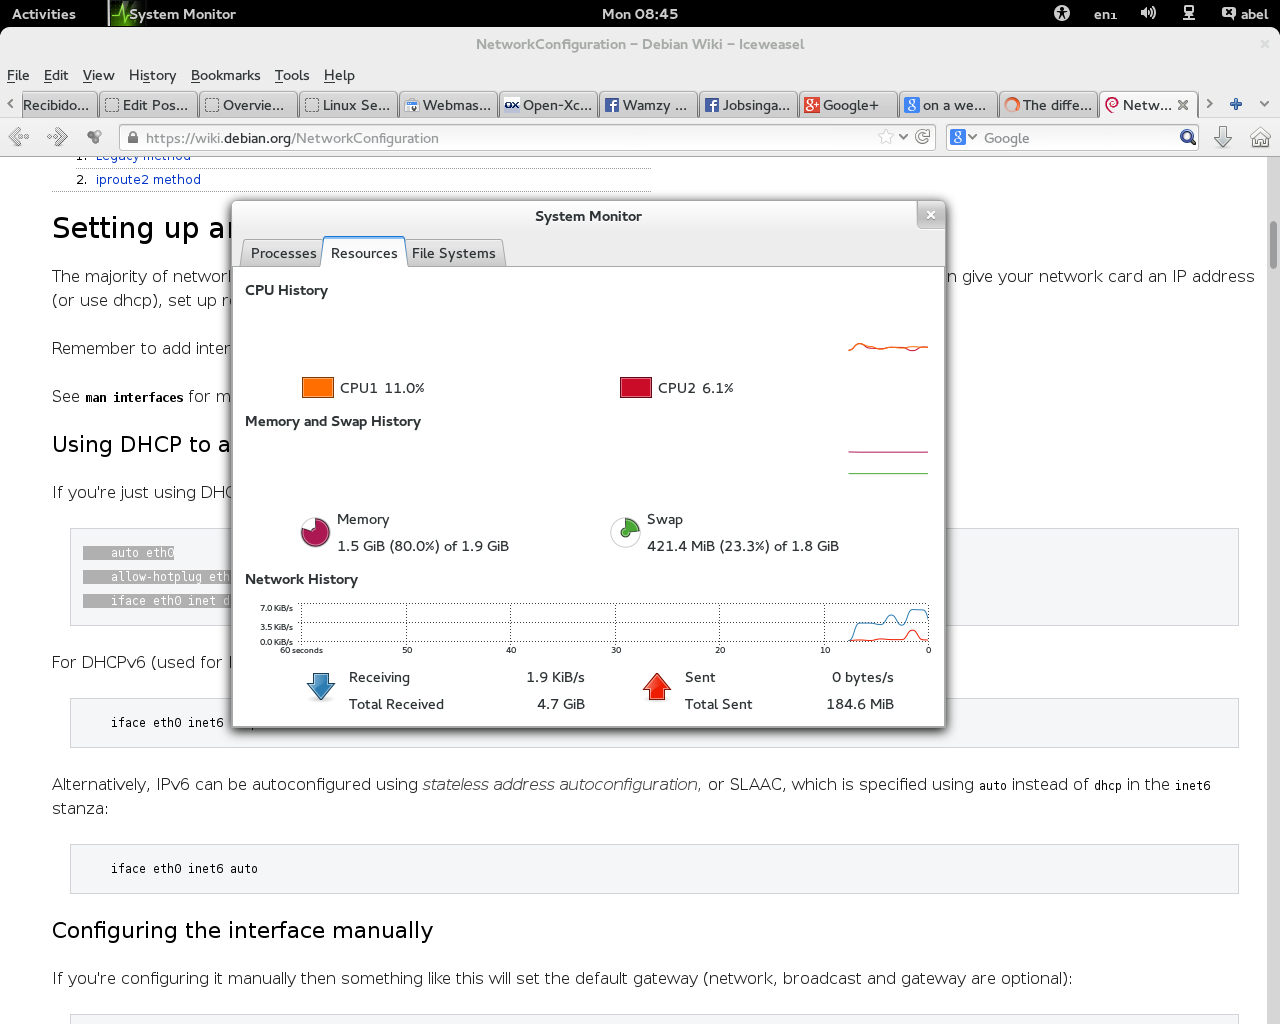
Network use of CPU resources
This post is part of a bigger Linux Debian administration material that you can access here.
Today we will deal with network and DNS configurations from command line. The graphical interface has different tools to configure the network and DNS, but this is a servers administrators post; so we will configure every thing from the command prompt. if you need more basic material explaining other aspects about Linux, Debian, basic commands etc, than you can go to the whole index of materials. We will only deal with IP version 4 (IPv4), but IPv6 is pretty similar. So you can learn IPv4 and then configure a network and DNS with IPv6 with just a few changes.
Now the main resources that I have used to create this material are the Debian network interfaces manual and the resolv.conf. You can access it by typing the following.
man interfaces
and
man resolv.conf
And the official’ Debian website material that you can find in the following link.
If you want to configure a network from the command prompt you have to know how to edit a file and some basic commands (Class 2 listed at the en of this page). In this material we will use nano for that purpose . Any way I will try to be as specific as I can and you can use any other editor of your preference. Also is advisable to have some knowledge about creating subnetworks and IP addresses. Lets start!
Network Configuration
The first thing that I am going to remind you off, also from Class 2 is a network command:
ifcofig: it lists your network interfaces; names, Mac Address (HWaddr), IP addresses (inet addr), Network mask (Mask), Broadcast (Bcast). For the Windows Network guys is similar to ipconfig /all. To test it you just need to run this in a root command prompt.
When you do ifconfig it shows a lot of text. Of course it depends on how many interfaces you have. For a computer with only one network interface (what we “normally” use as a workstation), it should show only 2 blocks of text. One corresponding to the Network interface. Normally this network interface is called eth0 for Ethernets and wlan0 for wireless connections. And an other one corresponding to the loop back interface.
The loopback Interface
“The loopback device is a special, virtual network interface that your computer uses to communicate with itself. It is used mainly for diagnostics and troubleshooting, and to connect to servers running on the local machine.”
Taken from: http://askubuntu.com/questions/247625/what-is-the-loopback-device-and-how-do-i-use-it on 2014-03-03.
Creating the network configuration to use a DHCP server.
Network Interface file back up.
Both of them, the loopback and the Ethernet interface have more or less the same information. Just that loopback is a lot simpler than eth0. But to summarize you need to know is that net ifconfig command shows the network configurations Currently running. It gives the network interfaces names, Mac Address (HWaddr), IP addresses (inet addr), Network mask (Mask), Broadcast (Bcast).
(Optional) First step. Lets backup the network interface content. To do that we have to edit the file /etc/network/interfaces.
root@khs01sw10:~# nano /etc/network/interfaces
It will show the content of a text file. the first action every time that you are going to change a configuration file is to backup the original. so using CTRL+o, we will save the file with a different name and then we will close it. After that just open again the file in /etc/network/interfaces. As we have a backup we can just delete every thing a create out own content.
Note: In case we make a mistake we can always go to our old configuration by creating renaming the backup file to interfaces. for that we can use the following command.
And it will move the file /etc/network/interfaces.back with a different name to /etc/network/interfaces. Also if we still need to leave a copy we can use the command cp with the same arguments. To get more information about this commands you can use man cp and man mv.
Now lets edit the file lets delete every thing in the file and lets create our own content.
Second open the file as I said with:
nano /etc/network/interfaces
Delete the content of the file. Al the text inside. for that you can just use Delete key, backspace or CTRL+k key to cut line by line.
write the following on the file:
auto lo
iface lo inet loopback

auto eth0
allow-hotplug eth0
iface eth0 inet dhcp
“Auto Ethernet” and “Auto eth0”
Auto Ethernet means “Select an Ethernet interface automatically”
Auto eth0 means “autoconfigure the eth0 interface”.
taken from: https://wiki.debian.org/NetworkManager on 2014-03-03.
Save using CRTL+o again. and we are done with the withing in the network file.
Restart the network interface. This step is basically test the configuration file integrity and reload the configuration from the file to the actual interfaces.
root@khs01wxl001:/home/abel# service networking restart
[warn] Running /etc/init.d/networking restart is deprecated because it may not re-enable some interfaces ... (warning).
[....] Reconfiguring network interfaces...Internet Systems Consortium DHCP Client 4.2.4
Copyright 2004-2012 Internet Systems Consortium.
All rights reserved.
For info, please visit https://www.isc.org/software/dhcp/
Listening on LPF/eth0/70:71:bc:b9:34:ad
Sending on   LPF/eth0/70:71:bc:b9:34:ad
Sending on   Socket/fallback
DHCPRELEASE on eth0 to 10.175.0.1 port 67
Internet Systems Consortium DHCP Client 4.2.4
Copyright 2004-2012 Internet Systems Consortium.
All rights reserved.
For info, please visit https://www.isc.org/software/dhcp/

Listening on LPF/eth0/70:71:bc:b9:34:ad
Sending on   LPF/eth0/70:71:bc:b9:34:ad
Sending on   Socket/fallback
DHCPDISCOVER on eth0 to 255.255.255.255 port 67 interval 4
DHCPDISCOVER on eth0 to 255.255.255.255 port 67 interval 10
DHCPREQUEST on eth0 to 255.255.255.255 port 67
DHCPOFFER from 10.175.0.1
DHCPACK from 10.175.0.1
bound to 10.175.0.146 -- renewal in 276 seconds.
ifup: interface eth0 already configured
done.
root@khs01wxl001:/home/abel#
If you receive this same warning do not worry, the warning is normal. It is just letting you know about of a configuration command that is deprecated and therefore is not supposed to be used any more.
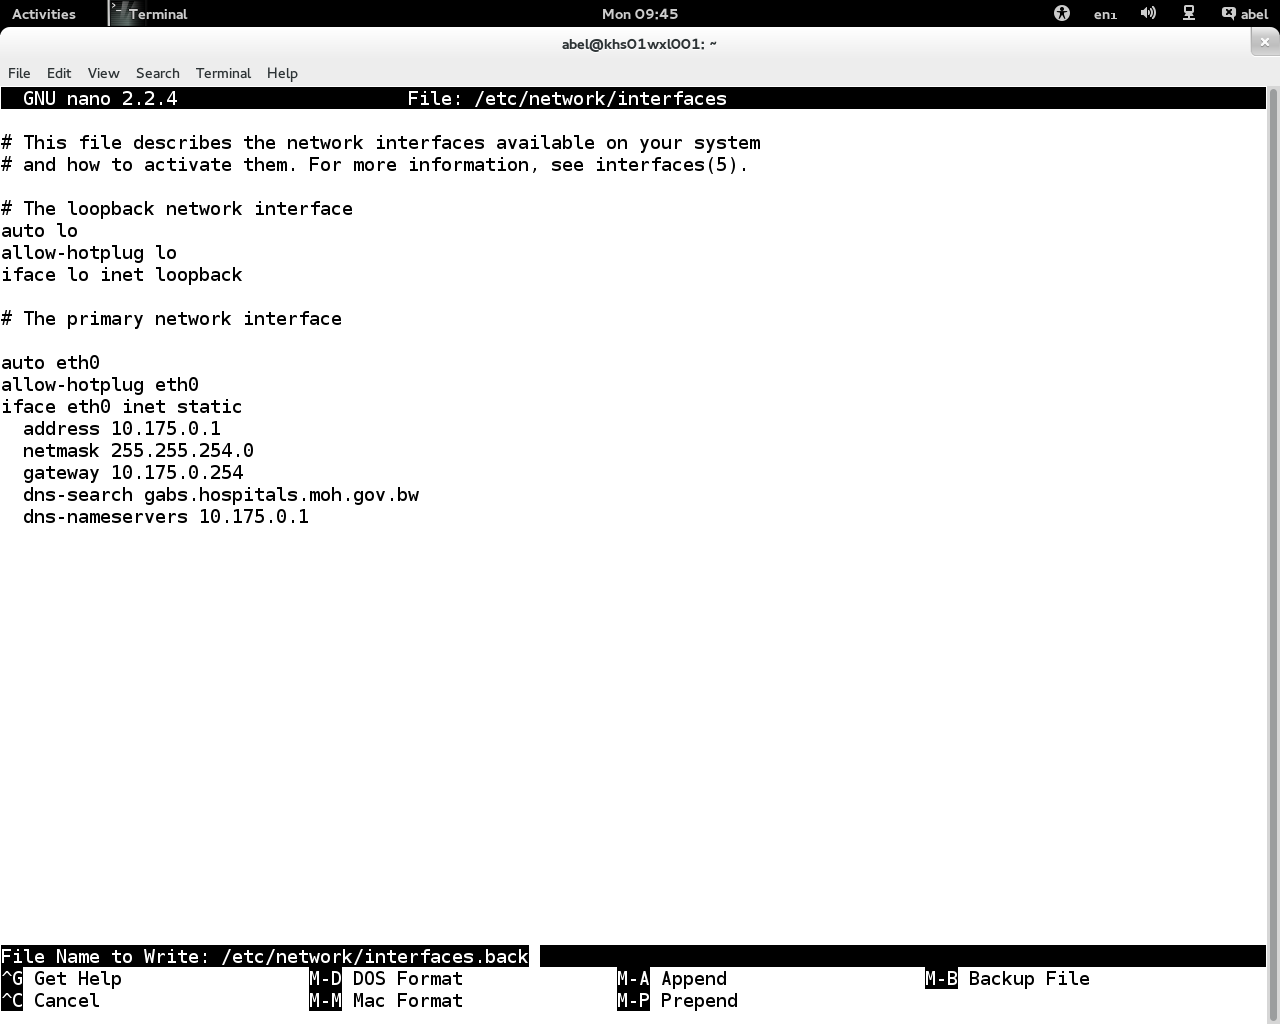
Creating the network configuration to use a static IP address.
To create an static IP address to access the network, the procedure basically is the same. The only difference is that you have to change the content of the configuration file to something something like this:
After restarting it is supposed to work just fine.
DNS client configuration
To connect to external resources using network names instead of IP addresses, the computer needs to use the DNS service. This service is very useful to translate from for instance php.net to the actual IP of the web server wherever this resource is located. In Linux systems all the DNS configuration for the client are located in a single file in etc or otherwise pointed from this file. The file is called resolv.conf.
The resolv.conf configuration file
“The configuration file resolv.conf at /etc/resolv.conf contains information that allows a computer connected to a network to resolve names into addresses. (Note: Do not confuse this configuration file with the program resolvconf, which unfortunately has a nearly identical name.)
The resolv.conf file typically contains the IP addresses of nameservers (DNS name resolvers) that will attempt to translate names into addresses for any node available on the network. There will be a line or lines that look like this:
nameserver 12.34.56.78
nameserver 12.34.56.79
In this example, the system is using nameservers at the IP addresses 12.34.56.78 and 12.34.56.79. Simply edit the file and enter the IP addresses of the nameservers you need to use after each nameserver. Add more nameserver lines if you have more nameservers. Don’t use this method if you have the resolvconf program installed.
The resolv.conf configuration file has many other options for defining how resolver looks up names. See man resolv.conf for details.”
Taken from: https://wiki.debian.org/NetworkConfiguration on 2014-03-03.
So basically you just have to open the file with nano or any other editor and change it to your prefered DNS.
And that is basically it. Today we have configured the network and learned how to change the DNS configuration. i hope that this knowledge is useful some how for you, if you have any question or you see any error, please feel free to post it.