The Protocol
DHCP server basic principles; installation and configuration; ISC Server on a Debian Linux system.
This post is part of a bigger Debian material that you can access here.
Content
- The DHCP protocol
- Precautions before we start
- Installation of ISC DHCP Sever.
- Configuration of the server.
- Checking the results
The DHCP protocol
The DHCP protocol was created to configure computers automatically just by connecting them to the network. That means that thanks to this protocol you dont need to do any thing to be able to connect to certain networks. you connect a new computer and the computer it self is able to talk to a server and get what it need to be able to connect and use the network resources that are available. but tel’s leave the smart guys to define what is the protocol.
“DHCP (Dynamic Host Configuration Protocol) is a communications protocol that lets network administrators centrally manage and automate the assignment of Internet Protocol (IP) addresses in an organization’s network. Using the Internet Protocol, each machine that can connect to the Internet needs a unique IP address, which is assigned when an Internet connection is created for a specific computer. Without DHCP, the IP address must be entered manually at each computer in an organization and a new IP address must be entered each time a computer moves to a new location on the network. [The protocol] lets a network administrator supervise and distribute IP addresses from a central point and automatically sends a new IP address when a computer is plugged into a different place in the network.”
Taken from: http://searchunifiedcommunications.techtarget.com/definition/DHCP on 2014-03-04.
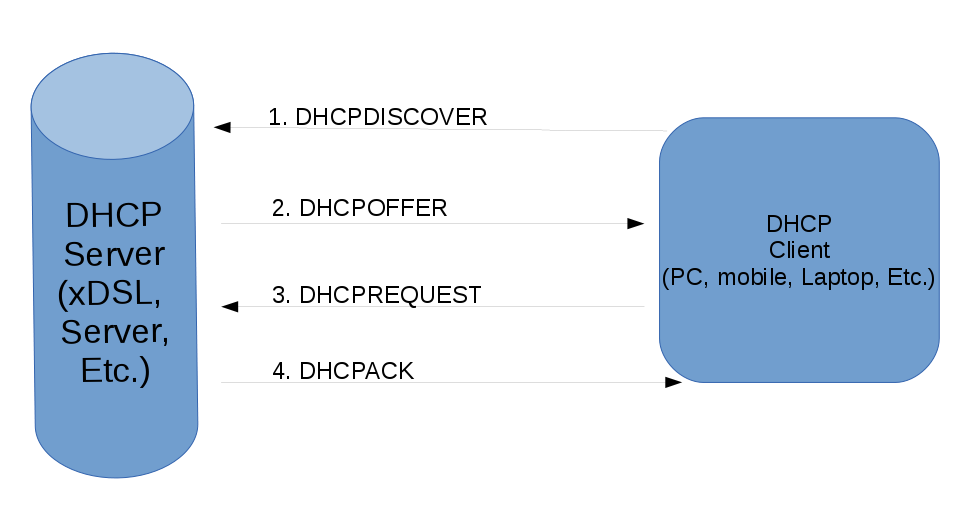
As a mater of fact what happens between the Client PC that wants to connect to the network and the server is a cert of conversation of messages until the client gets and IP addess. That is valid for a certain period of time defined by the server; check out the first picture. The messages include but not only the following.
- DHCPDISCOVER (taken from wikipedia) It is a message that marks the beginning of an interaction between client and server. This message is sent by a client (host or device connected to a network) that is connected to a local subnet. It’s a broadcast message that uses 255.255.255.255 as destination IP address while the source IP address is 0.0.0.0
- DHCPOFFER It is message that is sent in response to DHCPDISCOVER by a server to the client. This message contains the network configuration settings for the client that sent the DHCPDISCOVER message.
- DHCPREQUEST This message is sent in response to DHCPOFFER indicating that the client has accepted the network configuration sent in DHCPOFFER message from the server.
- DHCPACK This message is sent by the server in response to DHCPREQUEST recieved from the client. This message marks the end of the process that started with DHCPDISCOVER. The DHCPACK message is nothing but an acknowledgement by the DHCP server that authorizes the DHCP client to start using the network configuration it received from the DHCP server earlier.
In the other hand we will use today ISC’s DHCP server. ISC’s DHCP (isc-dhcp-server in Debian) software is the most widely used open source DHCP implementation on the Internet. The same software can be used for LAN too. It is a carrier and enterprise grade solution for any host configuration needs.
But before we start I have to give some advise about precautions that we need to make sure of.
Precautions before start.
Installation of ISC DHCP Sever.
- # aptget install iscdhcpserver
- # aptitude install iscdhcpserver
Sample output.
Reading package lists... Done
Building dependency tree
Reading state information... Done
Suggested packages:
isc-dhcp-server-ldap
The following NEW packages will be installed:
isc-dhcp-server
0 upgraded, 1 newly installed, 0 to remove and 11 not upgraded.
Need to get 0 B/411 kB of archives.
After this operation, 938 kB of additional disk space will be used.
Preconfiguring packages ...
Selecting previously deselected package isc-dhcp-server.
(Reading database ... 281728 files and directories currently installed.)
Unpacking isc-dhcp-server (from .../isc-dhcp-server_4.1.1-P1-15+squeeze8_amd64.deb) ...
Processing triggers for man-db ...
Setting up isc-dhcp-server (4.1.1-P1-15+squeeze8) ...
Generating /etc/default/isc-dhcp-server...
Starting ISC ... server: dhcpdcheck syslog for diagnostics. ... failed!failed!invoke-rc.d: initscript isc-dhcp-server, action "start" failed.
Configuration of the server.
Note: Remember to back up the original files as I advised before doing any work. To do that you can save the file on a different location or you can save it in the same place with a different name.
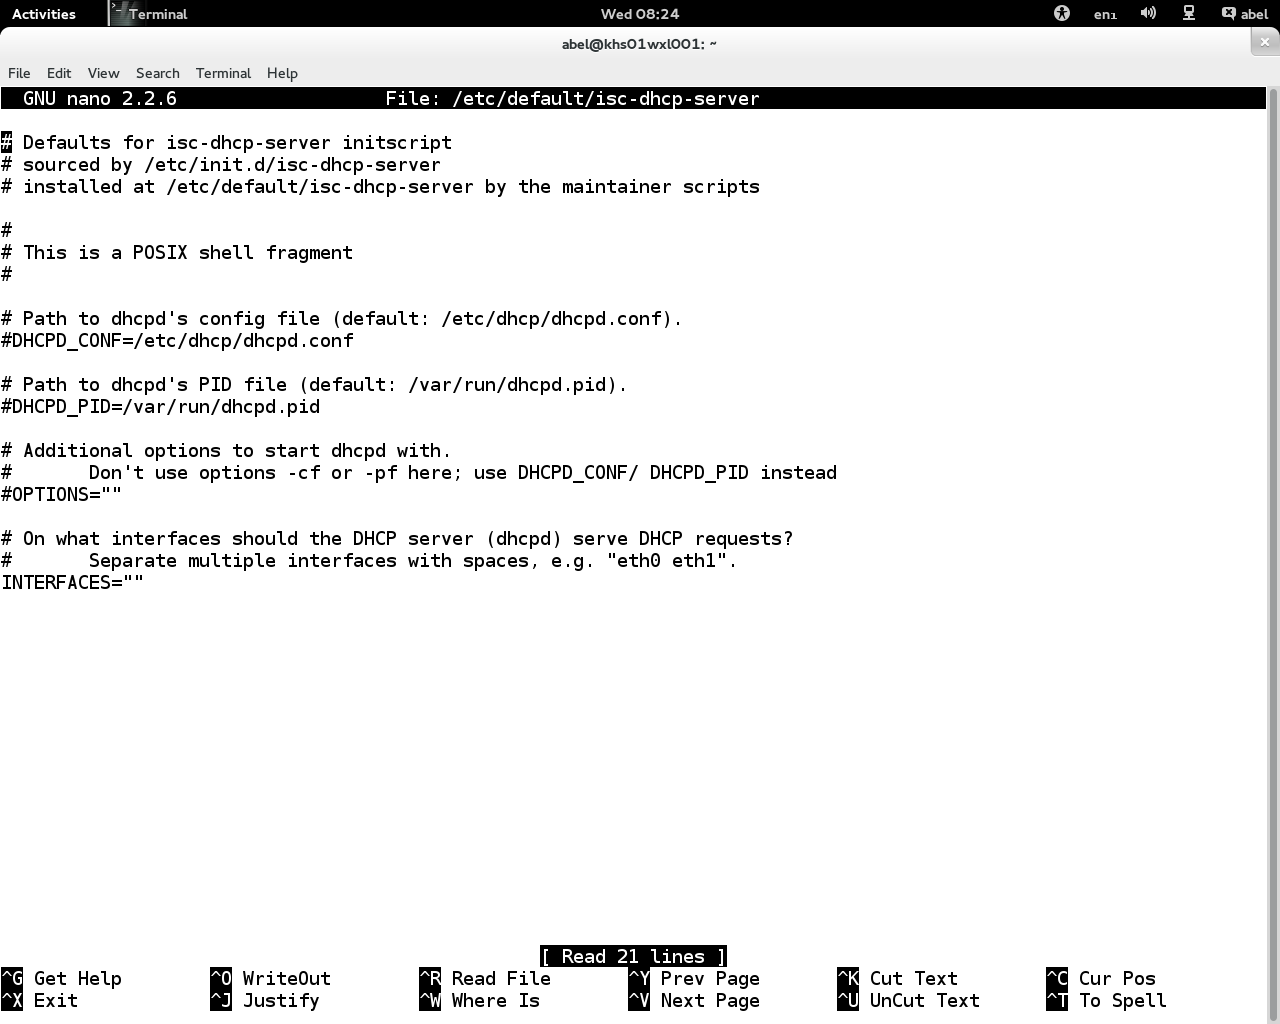
Edit isc-dhcp server default file
The first thing is to create the condition for the server to start. For that the only real requirement is to say the network interface to listen. Todo that first you should edit or create the file /etc/default/isc-dhcp-server with root permissions, either by running dpkg-reconfigure isc-dhcp-server or enter something like this into the file /etc/default/isc-dhcp-server:
INTERFACES="eth0"
option domainname "spices.org";
option domain-name-servers 213.191.92.86, 213.191.74.18;
subnet 192.168.1.0 netmask 255.255.255.0 {range 192.168.1.1 192.168.1.10;
option routers pepper.spices.org;
}
service isc-dhcp-server start
/etc/init.d/isc-dhcp-server start
Checking the results
tail -f /var/log/syslog
tail -n100 /var/log/syslog
cat /var/log/syslog
root@khs01sw10:~# tail -f /var/log/syslog
Mar  5 09:31:05 khs01sw10 dhcpd: DHCPREQUEST for 10.175.1.164 from 00:0f:fe:c6:1f:76 (medimizer3) via eth0
Mar  5 09:31:05 khs01sw10 dhcpd: DHCPACK on 10.175.1.164 to 00:0f:fe:c6:1f:76 (medimizer3) via eth0
Mar  5 09:31:06 khs01sw10 dhcpd: DHCPREQUEST for 10.175.1.198 from 00:30:05:c0:99:22 (khs01wx0010) via eth0
Mar  5 09:31:06 khs01sw10 dhcpd: DHCPACK on 10.175.1.198 to 00:30:05:c0:99:22 (khs01wx0010) via eth0
Mar  5 09:31:07 khs01sw10 dhcpd: DHCPINFORM from 10.175.1.89 via eth0
Mar  5 09:31:07 khs01sw10 dhcpd: DHCPACK to 10.175.1.89 (d4:3d:7e:d3:ed:ba) via eth0
Mar  5 09:31:07 khs01sw10 dhcpd: DHCPINFORM from 10.175.1.97 via eth0
Mar  5 09:31:07 khs01sw10 dhcpd: DHCPACK to 10.175.1.97 (d4:3d:7e:d3:ee:8d) via eth0
Mar  5 09:31:08 khs01sw10 dhcpd: DHCPREQUEST for 10.175.1.96 from 00:02:e3:32:c4:4b (khs01wx0188) via eth0
Mar  5 09:31:08 khs01sw10 dhcpd: DHCPACK on 10.175.1.96 to 00:02:e3:32:c4:4b (khs01wx0188) via eth0
Mar  5 09:31:08 khs01sw10 dhcpd: DHCPREQUEST for 10.175.1.184 from f0:27:65:35:45:73 (android-7f4c9b6f9482a823) via eth0
Mar  5 09:31:08 khs01sw10 dhcpd: DHCPACK on 10.175.1.184 to f0:27:65:35:45:73 (android-7f4c9b6f9482a823) via eth0
Mar  5 09:31:08 khs01sw10 dhcpd: DHCPINFORM from 10.175.1.221 via eth0
Mar  5 09:31:08 khs01sw10 dhcpd: DHCPACK to 10.175.1.221 (74:de:2b:ce:25:f4) via eth0
Mar  5 09:31:08 khs01sw10 dhcpd: DHCPREQUEST for 10.175.0.167 from 00:1e:79:28:5f:40 (Switch) via eth0
Mar  5 09:31:08 khs01sw10 dhcpd: DHCPACK on 10.175.0.167 to 00:1e:79:28:5f:40 (Switch) via eth0
^C
root@khs01sw10:~#