updated on 2013-10-01
Introduction:
This document explains the main steps of the configuration of a Linux network system. With two servers for medium of small size business (in this case a Clinic). But the same project template can be applied to any other business. The main objective of this project is to create a stable solution with the best cost effectiveness balance.
These servers will provide several services like Domain Controller (PDC), Centralized Users database, Control internet access and flow, backups server, a Firewall to stop intrusions, among other software and configurations, also seeking for cost reduction Linux software RAID 1 (hard Drive mirroring) had been used. This is the technical document that might serve as guide to configure as many servers as you may need.
Linux Solution Cost and other issues:
This project done by a Linux Specialist could cost between 20000 BWP (2500 USD) and 40000 BWP (5000 USD) depending on particularities of every business and the specialist’s hourly rates. Compared a Windows similar solution should a at least 10000 BWP (1250 USD) and 30000 (3500 USD) more expensive. Taking as a reference only the License costing. Linux Cost is free and windows cost is always important. Other issue is that Linux specialists are always more scarce than the windows specialists, but normally Linux specialist can manage to fix windows issues as well as Linux but not normally the other way around.
From now on, this document serves to explain the implementation of the network project in a clinic in Botswana that is currently using Linux for the servers and windows for the workstations. With no change on they way of doing the work for the end user. Here you will find an overview of the technical solution, each of the topics of attention in this project as well as links to more detailed manuals, explanations and configuration files. Every thing is very technical, but half understandable for humans.
Table of Contents
Introduction
- Configuration of a Network Client.
- Servers Hardware description
- Servers OS Installation
- Configuration of the Domain controller
- DHCP server
- DNS server
- Proxy server
- Webmin
- Firewall
- Bacula client
- Configuration of the back-up server Operating System
- Virtual box installation
- The Bacula service
Conclusion
Recommendations
Appendixes
Initial Project Request:
The clinic has 20 PC, with no antivirus solutions and the operating systems are windows, and it includes a pie of windows XP, Vista, 7 and 8.
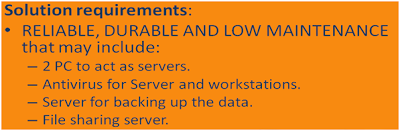
Normally the customer does not know very well what he wants/needs, so the Final Project Solution Included a few mote “things”
 .
.
 .
.To achieve a more effective solution that can be easily adjusted to diverse future uses the following was added to the initial project proposal:
- Software RAID
- DNS Server
- Proxy server
- DHCP Server
- Virtualisation Server
- Windows Virtual Server
The solution implemented
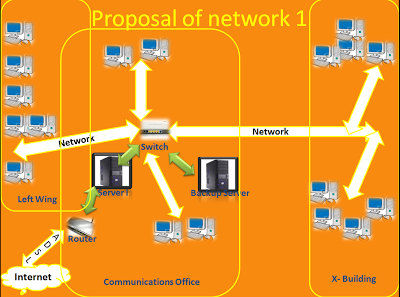
1. Configuration of a Network Client. The previous network has been re-used so the range of IP addresses remain the same i.e. 192.168.1.0/24Most of the IP addresses have been kept as they were before only the new modifications to the network were added.
- The list of the main IP addresses in the network is as follows:
i. Domain controller(LDAP, DHCP, DNS, Proxy, File Server): 192.168.1.51
ii. Backup Server and Virtualization server: 192.168.1.50
iii. Windows Virtual Machine server: 192.168.1.52
iv. Gateway (ADSL Router): 192.168.1.254
- Any client that is going to be manually reconfigured requires: an IP that is not in use in the range 192.168.1.xxx (where xxx = from 1 to 253 and different from all the user IP addresses). The gateway is 192.168.1.254; the DNS is 192.168.1.51 the WINs server (to access it click on advanced) is: 192.168.1.51 and the net mask is 255.255.255.0.
2. Server’s Hardware description.
- Processors: Core i3 x2.
- Motherboard: Intel DH61WW x 2
- HDD: Toshiba 500 Gb x 4.
- RAM: 4 Gb x 2
- Additional Network Card 10/100 Mbps.
3. Servers OS Installation:
Both servers have software RAID and each one of them has 2 x 500 GB HDD to create a RAID 1 mirror (One HDD is an exact copy of the content of the other one). The OS is Debian 6.0.6 Squeezy, it has software RAID support and is free software. As a guide for software raid partitioning the following manuals can be used:
- http://kb.haeringer.org/configuring-a-raid1-with-mdadm-on-debian-squeeze/
- http://importgeek.wordpress.com/2012/01/06/how-to-configure-raid-in-debian-squeeze/
- The partitions for both servers will be:
Partition | Space | Type |
/ | 10 Gb | Primary |
/boot | 100 Mb | Primary |
Swap | 2 Gb | Primary |
/var | 30 Gb | Logical |
/Home | Rest | Logical |
- After the installation is finished you can check the RAID status using the command
cat /proc/mdstat. For more information read the manual on: http://microway.com/hpc-tech-tips/2011/08/managing-a-linux-software-raid-with-mdadm/ - In the case that one of the HDDs fails, the way of replacing it correctly can be found in this manual: http://www.howtoforge.com/replacing_hard_disks_in_a_raid1_array
- After installing an update and upgrade of the OS it is recommended, to do that execute aptitude updateandaptitudesafe-upgrade.
- After the installation it is also recommended to install SSH for remote administrative access, remember that this server could be working without a monitor.
4. Configuration of the Domain controller.
- To Install the PDC server you need to follow several manuals: configure an LDAP server to host the database of users and passwords. Configure the computer as LDAP Consumer or Client on the server to be able to user LDAP as login method. Also configure Samba as a PDC using LDAP and lastly configure the client computers (join the windows computers to the domain).
- Manual to install LDAP server: http://www.server-world.info/en/note?os=Debian_6.0&p=ldap&f=1
- Manual to install LDAP Client: http://www.server-world.info/en/note?os=Debian_6.0&p=ldap&f=2
- Manual to install and Configure Samba server: http://www.server-world.info/en/note?os=Debian_6.0&p=samba&f=4, the smb configurationfile for the servercan also be found in Appendix I
- Manual to configure the windows client: http://www.server-world.info/en/note?os=Debian_6.0&p=samba&f=5When a windows computer is being joined to the domain first:
i. Login as a local administrator.
ii. If it is a Windows 7 computer go to \\fileserver.clinic.com\install\DomainRegistry find the domain script named Win7_Samba3DomainMember execute it and accept to modify your registry settings, then go to step iii. If it is Windows XP or Vista go straight to iii.
iii. Go to start, right click on the Computer (My PC in windows XP) and go to Properties.
iv. The system window will appear, in the left side menu click on Advanced System Settings.
v. Click on Computer Name.
vi. Click on Change.
vii. Select Domain, write in the text field “clinic.com” and click OK.
viii. You will be prompted for user and password; youshoulduse the clinicadmin user and its password.
ix. When a computer is being joined to the Domain you could receive two errors, the first one saying ‘your computer has not been found on the database and has failed to be joined to the domain’, in that case you have to retry joining it to the domain. The second time it is supposed to work, but after giving you the welcome message you can receive another error related to the DNS server. None of these errors is important and they do not change or modify the behavior of the windows computer in the future, these are just Communication ERRORS between Linux and Windows. If you receive the welcome message you are already in the domain, there is nothing to worry about.
x. Then you are supposed to make the clinicadmin user a local administrator, to do that you have to go to Start->Control Panel->User Accounts->Manage another account then in there you can add clinicadmin from the domain clinic.com as a local administrator (this is one of the ways on doing this, but you can use the way you feel comfortable with if you know other)5. DHCP server: This service helps with the automatic configuration of the network in computers. The configuration file is also a manual that can be found in /etc/dhcp/dhcp.conf (Appendix II)
6. DNS server: This service helps with the translation of names to IP addresses and vice versa. There is a lot of documentation on internet, any way Webmin (https://192.168.1.51:10000) which will explained further on was used to configure it, but the following manual may serve to modify the server manually if is required: http://www.server-world.info/en/note?os=Debian_6.0&p=dnsthe names of the diferent hosts are: clinicserver50, clinicserver51 and fileserver should be resolvable from any computer, if the computer is not able to respond to this requests, then it needs to be reconfigured or there is a server or network problem. The configurationsusing webmin are attached as the Appendix III.
7. Proxy server: This service is used to control Internet browsing. It’s configuration file is also a manual (/etc/squid/squid.conf a copy on the backup server and you can find some Webmin picture as Appendix IV) and you can also find a lot of information to modify the server on Internet: http://www.server-world.info/en/note?os=Debian_6.0&p=squid
8. Webmin: This is an administration platform that allows you to modify all the services on the server using a web interface. To access it on the local server you can do the following:
- (if required) Configure your browser not to user proxy for local addresses.· Open your browser and write in the address bar: https://192.168.1.51:10000
- It will then prompt you for user name and password, enter the root user and password to gain access to the administration platform.
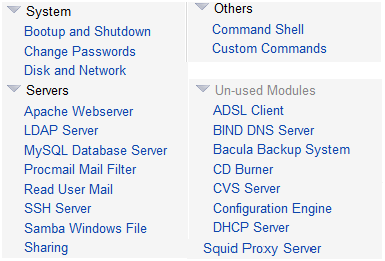
- Webmin has a very simple interface, the main relevant aspects for the sake of this project are:
The system is organised in a tree view with a lot more than what is being shown on this picture, but this picture shows the main modules that we should focus on; Boot and Shutdown, Change Passwords (not for Domain users, use this module only for the root user), Samba server, Custom Commands (used mainly for managing Domain users and groups) Bind server, Bacula, DHCP server and Squid Proxy Server:
i. Every time you modify a service restart the service so that the changes can take effect. Every module (server) on the main page has a button to restart it.
- To manage users and groups after logging-in to webmin go to ‘Others’-> Command Shell and execute the following commands.
Create a group of users:
smbldap-groupadd -a myuser
Create a user as part of a group:
smbldap-useradd -am -g domainadm lily
To modify a user and make it part of a group:
smbldap-usermod -g reception kgomotso
To create a password for a user go to Unused modules-> LDAP users and groups, click on the user name, it will open the user details for edition. On the password section select Normal password and then fill the text field with a password and click Save.
Existing groups of users:Directors, Managers, Reception, Rental, Sales, Accounts, Drawings, Consultants, Stores.
9. Firewall: this service restricts internal unauthorized accesses to outside using a not very secure structure, but very usefull. IPTables firewall currently running on the server:
#Delete all Rules
iptables -t nat -F
iptables -F
#ebtables -F
#ebtables -t broute -F
#iptables -t nat -A PREROUTING -s 192.168.1.0/24 -p tcp –dport 80 -j REDIRECT –to-port 3128
#Deney External direct conection to HTTP, HTTPS, SQUID & 8080
iptables -A FORWARD -s 192.168.1.0/24 -i br0 -p tcp -m tcp –dport 80 -j DROP
iptables -A FORWARD -s 191.168.1.0/24 -i br0 -p tcp -m tcp –dport 8080 -j DROP
iptables -A FORWARD -s 191.168.1.0/24 -i br0 -p tcp -m tcp –dport 431 -j DROP
10. Configuration of the back-up server Operating System: As explained above, the configuration of the back-up server’sOS and the domain-controller are similar. This server also hosts a virtualization service using VirtualBox to virtualize a Windows 7 Box to host Pastel payroll and Quickbooks. It also contains the backup system using bacula.
11. Virtual box installation: from the official website www.virtualbox.org the installer for Debian 6 can be downloaded and also the official manual containing the installation instructions. It’s a straight forward process and the platform is not complex as it only needs to be used for one virtual machine.
- On the file /etc/rc.local there is one command line near to the end of the file that automatically starts the Windows Virtual machine, this server also has a graphic environment that might help in case of failure.
12. The Bacula service is installed to automatically backup the files on the client machines (find the Manualonhttp://www.lucasmanual.com/mywiki/Bacula#stop.2BAC8-delete.2BAC8-cancell_jobs and Appendix V to see the configuration files). This service is divided in 4 parts or subsystems that are installed and work separately:
- The bacula File Daemon or bacula-fd: is installed as the client part of the system on every computer (box) that needs a backup. The most important is the one installed on the domain controller that stores the homes of all the users and all the company folders. The configuration file is self-explained, and it’s located on /etc/bacula/bacula-fd.conf, in this file the client just needs to know the Director server (bacula-dir) and the security password for this server.A copy of the configuration file is attached as Appendix V-A.
- The Bacula Storage Daemon or bacula-sd: is installed as the storage system for the backup data, this system only store and restores the things that the Director commands and it’s configured to do that on /home/bacula. It has more than 350 Gb of storage capacity and only needs to know where to store the files and the security password of the director to work. The configuration file can be found on the server on /etc/bacula/bacula-sd.conf.A copy of the configuration file is attached as Appendix V-B.
- The Bacula Director or bacula-director: is the brain of bacula, it manages the entire backup and restoration works to be done, this service says who, when and how someone is going to do any back-up or recovery job. It checks the password configurations and executes jobs. The configuration file for this service can be found on /etc/bacula/bacula-dir.conf, inside this file you can find the passwords for the different clients, the storage daemon, the schedules, the storage devices and the clients definition, etc. A copy of the configuration file is attached as Appendix V-C.
- The bacula console is the software that can be used to manually manage the server behaviour, the main commands are: bacula-console to login to the console, status client to see the status of any of the clients, status director to check how the director is working, status storage to check the storage daemon and run and restore to manually run commands of backup and restore.
- The work was done successfully and documented.
- The servers had been working now for 6 moths with no interruptions, exept for the typical power breaks from Botswana.